With the competition season mostly over, I've been able to spend some time catching up on write-ups, classwork, and projects. I'm also able to start releasing the materials I created for my team this year. Starting with Get-ADInfo, the first (sort of) Powershell module I've created. You can find it here https://www.powershellgallery.com/packages/Get-ADInfo/1.0.0. Additionally, you can also find it on my GitHub.
Module Information
Get-ADInfo is a module that was created to help facilitate Active Directory object enumeration. I spent a lot of time last year developing security tools for Windows servers, but I hadn't really done anything neat with basic enumeration stuff. So I wanted to create some enumeration tools for our Windows people this year. Get-ADInfo was the first tool I started working on, and probably the one that turned out the best, as I was quickly overwhelmed with relearning bash and some of the more advanced Linux skills I had forgotten after focusing on Windows for so long. Essentially, Get-ADInfo works by pulling critical information out of certain AD object cmdlets. In some cases, I had to make some custom objects, but in general, the cmdlets provided in the module are re-skins of the AD object cmdlets ordered in a slightly easier-to-understand way.
By default, all the commands will enumerate all objects. However, for each cmdlet, the object name can be specified with the -Name property. For example, Get-ADGroupInfo -Name Administrators will list all information about the Administrators group. I designed it to run through all objects if no property was given to speed up the enumeration process, as this module was originally designed for a competition environment.
Function Get-UserInfo
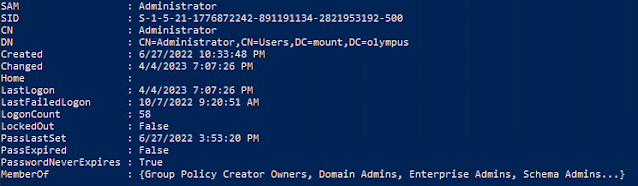
The Get-UserInfo function provides critical information about the specified user (or all users) including membership status. For example, if user 'Test' is a member of the group 'Test-Group', this cmdlet will pull that information and display the membership. Additionally, it grabs logon information, display info, and other useful details. I personally find it more useful than Get-ADUser in terms of getting an overview of users.

Example Output of Get-UserInfo
Function Get-OUInfo
Unlike Get-UserInfo, Get-OUInfo has quite a bit of custom properties. When I was first writing this module, I had never done any kind of custom object creation or module creation, and this was the first cmdlet I started working on. I certainly learned a good bit while making this one.
Get-OUInfo lists information about the specified (or all) organizational units. This information includes the linked users, groups, and computers. Aside from the linked objects, it also displays management and display information.
 | ||||
Example Output of Get-OUInfoFunction Get-GroupInfoThis is the simplest of the cmdlets in this module. For every specified (or all) group, the group's members and the owners are listed alongside creation and display information.
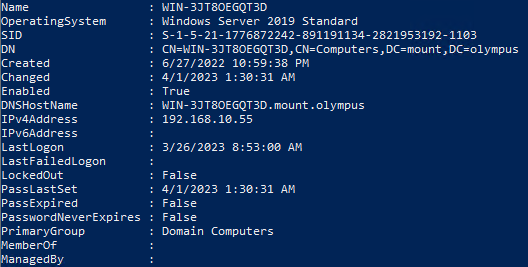
Function Get-ADComputerInfoThis is the most complex cmdlet in the module. It provides a wealth of information on each connected computer in the domain. For example, it shows networking information such as DNS hostname, IPv4, and v6 address. It also displays the logon information like last logon date, password change dates, and expiration dates. Of course, it also gives the AD management information as well, like created dates, enabled status, and distinguished names. It will also show linked members and owners.
|

Comments
Post a Comment