
Using Zerologon to exploit and dump credentials from a Windows 2012 AD server

EDIT: Related video made for a class

The CCDC qualifiers are over now, and my team got 1st! That being said, towards the end of the day, we noticed a lot of suspicious traffic coming to the AD box. While I couldn't figure it out during the competition, it turns out that the red team had been using the zerologon exploit. After we got back, I wanted to learn the ins and outs of this exploit in order to prevent myself from getting hit with it again at the next competition. Turns out, it's relatively easy to set up and execute using Impacket and Risksense' zerologon script. 

 For the testing environment, I have a Windows lab consisting of a 2012 AD, 2019 Email server, 2016 Docker/Hyper-V box, and Windows 10 and 7 machines. This setup is for CCDC prep and is designed to mirror the environments and machines used in the competition. I also have a kali box running on the same network as the Windows machines. This is what staged the attacks on the 2012 AD server. 

 To begin with, I had to do some research and reading on the exploit process and setup. Making sure that the systems hadn't been patched with KB4601357, the Microsoft update that solves the Netlogon vulnerabilities that allow the zerologon exploit to work, and pulling down the newest version of Impacket and the zerologon exploit script to the kali box. Once the scripts and AD were ready to go, I started Wireshark on the AD server and got to executing the first steps of the exploit. 

 Step 1) Using the zerologon exploit script to set the machine password of the domain controller to be empty. 
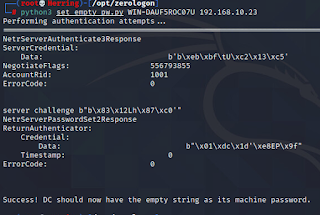
Step 2) Using Impacket's secretsdump to get the password hashes of the accounts on the domain controller

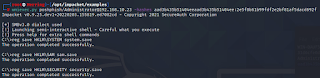
Step 3) Running wmiexec to establish an SMB connection using the credentials of the Administrator account.


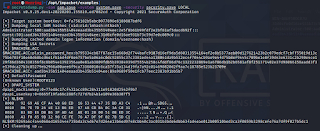
Step 4) Using secretsdump again, this time with the registry values taken from the domain controller.


Step 5) Finally, we can restore the original password to the domain controller, leaving our presence largely unnoticed. 


Here is the Wireshark capture from the AD machine.

In the end, we're left with the credentials for the domain administrator, which allows us to do just about anything we want to the victim. They likely wouldn't even know they had been hit with an attack. I certainly couldn't figure it out beyond some suspicious processes and packet traffic. 

If this is the level of stuff we're seeing in the qualifiers, I'm looking forward to seeing what they hit us with in the next level. Being able to get hands-on with the systems and try to protect and respond to real-time threats has been a great learning experience. It's definitely a little hectic and crazy when you're seeing all these red flags appear and have no idea what's going on, but I love that feeling of excitement and the rush you get when you finally figure out what's happening and how to fix it. The red team definitely kept me on my toes during the competition, and I left with a huge list of things to learn and research further. 

Now, it's time to start preparing for regionals. We're bringing it home!


Comments

Popular posts from this blog

Using PGPy to encrypt and decrypt files and messages

 PGPy is a library for python that enables the creation, storage, and encryption/decryption of PGP keys and files in python. Recently, in a small project to reacquaint myself with python, I used PGPy for key generation and encryption and decryption. That project can be found in my github at  https://github.com/lpowell . The goal of the project was to use command-line switches to control the program, and to provide basic encryption and decryption capabilities, along with rot13 and base64 encoding.  First, to load in a key use key, _ = pgpy.PGPKey.from_file(keyfilename) . This loads the key from either a binary or ASCII armored file. You can swap out .from_file for .from_blob , if you plan on using a key stored in a string or bytes object rather than a file. In my example code, I pull the key from a file, as I found it to be the simpler method.  Next, you'll need to open a file or create a string or bytes object that contains the message you wish to encrypt. We'll call this file

Using the Ubertooth One to sniff and intercept Bluetooth packets

While researching for my individual video project I came across this tool which allows for the sniffing and interception of bluetooth packets. This article covers some of the basic functionality of an Ubertooth One.  It's really quite interesting to see all the possibilities with devices like these. The tech behind them is very interesting as well. Hopefully, I'll be able to integrate some of this technology into my project video and include a demo of some of the interesting things it can do.

Installing the Ubertooth on the Mac mini M1

 For my video project, one of the demonstrations included using an Ubertooth One to scan for Bluetooth and BLE packets. This blog post will cover the installation of the Ubertooth One on the Mac mini M1. The official install guide for Mac devices didn't work very well for me, and I had to install some extra tools in order to get it to work. The examples assume you are using Python 3, and have homebrew installed.  To begin, follow the instructions found here:  https://github.com/greatscottgadgets/ubertooth/wiki/Build-Guide . Additionally, you may find that you need to install pytq5, numpy, and qtpy. To do this, simply run Python3 pip install pyqt5, numpy, qtpy. This will install the required libraries needed to run the Ubertooth tools. There are multiple ways to install pip on an OS X device, but I suggest using homebrew to install python3, which should install pip as well. Next, you will need to update the firmware of the device. When downloading the tools, a firmware directory sh